Preparation wall plaster: features wood coatings seats joining dissimilar surfaces, and a wire mesh reinforcement
Table of contents
-
1 The sequence of work
- 1.1 Preparing wooden walls
- 1.2 Preparation of places of joining dissimilar surfaces
- 2 Reinforcement surface mesh or wire
- 3 Preparing the old layer
- 4 Total
In any kind of repair work important theoretical skills, is no exception and the preparation of the walls under plaster.
In this article, we will tell you how to prepare for finishing concrete, brick and wood walls, describe the method of surface leveling, we learn to use for these purposes and plaster grid wooden lath.
The sequence of work
Surface preparation is carried out after:
- piping flush the heating systems, water supply, sewerage;
- laying hidden wiring;
- installation of window and door frames, built-in furniture;
- installation of fasteners for different devices.
Preparing walls for plaster includes a range of activities.
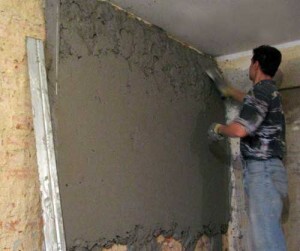
1. Eliminating uneven walls.
The walls should be checked for the presence of vertical and troughs. Removal of unevenness by applying a thick layer of the solution increases the flow plaster 1m2 and also take longer time for applying the mixture in layers.
The building regulations contain the following tolerances of the finished surface of various types of plaster.
- for the simple mixture of deviation from vertical - not more than 1.5 cm in height of the room or no more than 3 mm per 1 m when the thickness of the plaster layer of not more than 1.2 cm;
- for improved plaster deviation from vertical - not more than 10 mm in the height of the room, or not more than 2 mm per 1 m of the surface.
- thickness improved plaster shall be not more than 1.5 cm;
- for high quality type plaster deviation from vertical - not more than 5 mm in the height of the room or 1 mm to 1 m when the thickness of the plaster surface gallop not more than 2 cm.
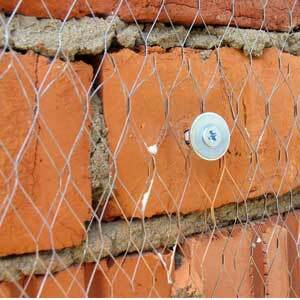
Irregularities in walls can be eliminated by using a wire mesh with mesh size of 10x10 mm.
On masonry such mesh is attached with nails, which are driven at the seams masonry.
On the concrete surface mesh is fixed in the ground reinforcement issue. To prevent rust mesh processed cement milk.
Small depressions and cracks are sealed solution, the work is done at least three days before the start of the alignment of the walls with plaster.
2. Purification walls with soot, grease, dust and various contaminants.
These defects can significantly reduce the bond strength of the solution with the surface.
Stone, brick and concrete surfaces are cleaned with 3% hydrochloric acid solution. After cleaning, the surface is washed with clean water.
Get rid of the oil stains on the walls and ceiling, you can use a fat clay. It is applied a thick layer on the affected area, the surface is dried and purified from the clay, which has absorbed fat. If necessary, the procedure is repeated several times.
However, this method does not always give one hundred percent guarantee that over time the oil will start to appear again outside. Therefore, experts recommend completely cut down grease stains, indentations seal the solution.
The surface is cleaned of dust, dirt and debris from the solution using a steel brush, which is tightly pressed against the surface and move in different directions.
3. Work to improve the coupling of a solution with a surface.
- Seams masonry embroider, carrying them to the deepening 1 cm for cavities between the bricks. It should be noted that this procedure is effective only for the walls of brick on a porous basis. If the brick is smooth, for the roughness on the wall made incisions with a hammer and chisel.
- On a concrete wall smooth necessarily knurled ax or hammer. The depth of the notches must be about 0.5 cm and a length of 5-10 cm.
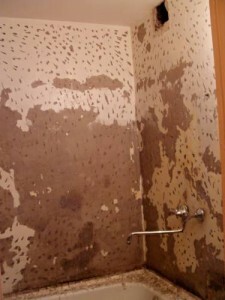
Wall plaster with notches
- Before you start plastering the walls with his own hands the surface is moistened with water and a brush.
- Areas with oil paint must be cut down.
Preparing wooden walls
On smooth wooden walls and ceilings plaster will not hold.
Therefore, wooden surface before applying the plaster coat:
- reinforced mesh;
- wooden shingles;
- reed mat.
Lath - a pinned kick slats made from a round pine wood pieces. The length of the strips is typically 1-2 meters. lath engraved on the surface of the nails of one rail or ready shields.
In the photo lath (price - from 200 rubles).
By way of manufacturing lath is:
- puncture (1.5-2 cm wide);
- Hardwood (2.5-3 cm wide);
According to the method of application:
- prostilnoy (bottom);
- output (top);
Prostilnaya lath consists of curves, narrow and thin strips. Its width is not less than 3 mm. Lath stuffed at an angle of 45º with respect to the plane of the floor and with a pitch of about 45x45 mm slats for walls, ceilings - 40x40 mm. Her barely nailed to secure. nails length 2.5-4 cm, diameter 1.6-2 mm.
On top of the prostilnuyu (lower) laths, at the same angle stuffed outlet (upper) laths, so that between the surface layers could be seen. These voids will be filled with the solution and hold the base layer of plaster.
Important! Before nailing lath better to moisten with water, so less likelihood that they will crack. For this reason, the nails should be driven into a checkerboard pattern with a small offset from the center.
Output lath consists of strips of thicker flat width of 1.5-2 cm. Racks smaller width will crack during nailing and more - strongly swell from moisture and buckle, leading to tearing of plaster.
Output lath nailed on both ends of the rails, hammering nails at an angle of 45º and directing the tip to the end of the lath, thereby conducting its stretching. The further mount intermediate lath nails through two prostilnye slats on the walls and through a ceiling.
Important! It is impossible to connect the ends of the rails accurately butt, since they can swell to break the plaster. It will be enough to leave a distance of 2-3 mm.
Preparation of places of joining dissimilar surfaces
Brick, concrete, stone or metal have different density and drying rate renders them different. To avoid occurrence of cracks in the slopes of rendered, angles and other locations conjugation different surfaces of these portions is recommended to reinforce the stainless metal gauze. The diameter of the wire mesh of 1.5-2 mm, the cell size - 30x30 mm, width of mesh strip - no less than 20 cm.
The mesh is placed on the corner and nailed:
- to the wooden surface - on nails or screws;
- to concrete and brick base - on plugs;
- the metal - Screw-on metal or by welding.
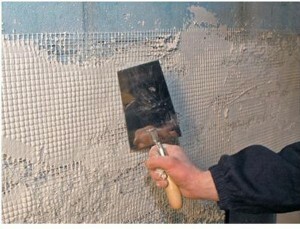
Reinforcement surface mesh or wire
If the layer thickness is assumed to 4 cm, the reinforcement wood surface is applied a metal grid or wire.
Instructions for working with their hands:
Stainless mesh with a mesh of 10x10 mm to 40x40 mm cut into lengths of the required value and is fixed to the walls and ceiling with nails, at the same time pulling it strongly. 80-100 mm nails are staggered in steps of 10 cm. The upper part of the nail is bent, holding the net.
Braided wire nails provides a better surface roughness compared with the finished woven mesh. Nails are driven into the ground staggered at a distance of 1 m. It should be borne in mind that the nails are recessed into the cap layer next approximately 2 cm.
Copper or stainless wire with a diameter of 1-2 mm is wrapped several times around the nail head and pulling well lead weaving network.
Preparing the old layer

Preparing for the upgrade of old plaster
According to the technology should not be applied to old plaster solution, but it can be updated by using a solution for peretirka consisting of lime, silica sand and water.
Surface preparation for upgrade:
- Prostuchite povrehnost old wooden mallet to identify bad sites and keep these places clean from plaster to the base.
- Clean the old paint from the surface.
- Remove Nabeul.
- Strip all the cracks, chips, scratches over the entire depth, use water.
- Efflorescence, grease and mold marks and cut down with an old plaster.
- Broken-off portions seal the solution from which the mixture is made. If the old plaster layer was more than 3 cm, first slide obryzg thin layer of a liquid solution, and then apply a primer. After drying the solution swipe update the entire surface.
Total
Without a carefully prepared surface it is impossible to get high-quality plaster, therefore, this stage of work should be paid no less attention than the very process of plastering or choice of materials. We can only offer you useful and interesting videos in this article.